Designing With Canva – 5 Design Principles to Remember
For a non-designer who wishes to explore design, Canva is a great tool. For quick one-off designs and personal design requirements, you can easily change a couple of things on an existing Canva template and you are good to go. But if you are using Canva for your marketing designs, you need to have a plan of action. And one of the requisites in this plan will be to understand the basic design principles. Using these design principles when designing with Canva can elevate the quality and appearance of your designs a great deal.

The designs you create for your brand speak for your brand. They are about first impressions. These designs are about conveying your brand personality. And they have a role to play in shaping your brand image. On the whole, these designs play a vital role in the growth and progress of your brand. If you want them to look professional and play their part, then ensure that your Canva designs are in line with the basic design principles.
Design Principles and How to Use Them While Designing With Canva
One of the strongest distinguishers between design and art is that design needs to have a strong functionality in it. Without purpose, the design feels meaningless. Graphic designs used to promote your brand are the perfect examples of this. When you do not know what you want to say, how can you say it effectively, right? That’s why one of the most important things to do while creating marketing designs will be to define the objective of your design.
Your design will be built around this objective. And to be sure that your customers interpret the meaning of your design the way you visualize it, design principles can be of help. Here are some basic design principles that non-designers should understand when they are designing with Canva.
1. Negative space
Too many design elements crammed up in a little space can cause a lot of visual strain. And in such cases, there is no clear focal point. The objective of your design is lost here!
To avoid this, limit the number of elements in your design and add enough negative space. This serves two purposes:
- Ensures legibility
- Creates emphasis
a) You need negative space for legibility because overlaps often cause confusion in design and improper text spacing affects readability. Here is an example.

In the above design, there are many items displayed on each page. The font used is also a tricky one to work with but then it aligns with the brand’s personality and visual style. In such cases, the wise use of negative spaces ensures that the text is easy to read. The even distribution of negative space shows that all items on the page have the same priority.
b) In terms of emphasis, if there is a lot of white space surrounding a particular element in the design, then a viewer’s eyes are automatically drawn to that element. Here is an example.

Since there is a lot of text on the business card, the use of negative space ensures that users notice the name first. The above design is also a good example of contrast in design. We’ll talk about this in our next section.
Kimp tip for designing with Canva
Look for templates that incorporate enough negative space. And when you customize the templates by resizing the elements or moving them around, remember the above two purposes of negative space in design.
2. Contrast
According to the Von Restorff effect, an item that stands out is often the one that our mind remembers easily. To put it in design perspective, if you create your design such that one particular text section or a button (like the CTA) stands out from the rest of the design, people are most likely to remember that item a little longer. One way to achieve this is through the use of contrast. Contrast in design tells how one element differs from (or contrasts from) the others.
You can achieve contrast through variations in the color and size of the elements. For example, bright yellow text stands out on a solid black background. And the contrast between black and white is something we all know. Here is an example that makes use of both these ideas.

In a text-heavy design like the restaurant menu design above, legibility is crucial. And contrast ensures that viewers can read the text conveniently.
Another way to use contrast is by altering the size or visual weight of the element. For example, bigger font sizes vs small font sizes and bold fonts vs fonts with thinner line weights.

In the above flyer design, the bolder and bigger fonts for the subheadings make them stand out. The design also uses script fonts and sans-serif fonts within each subheading in order to further break down the text into meaningful segments.
Kimp tip for designing with Canva
Be extra careful when you choose background images or solid background colors. Because you want the foreground font to be clearly visible. Decide whether you want your brand colors in the background or in the fonts. Then choose a contrasting color for the other element.
3. Balance
First things first, balance is not the same as symmetry. In fact, visual balance can be both symmetrical and asymmetrical. Balance is when you plan the textures and visual weights of various elements in a design such that they all look harmoniously put together. Without balance, your design might look good but on observing it carefully, it might feel like the elements are all falling apart.
In fact, if you compare a design by a professional and a design created by a non-designer, balance might often be that one distinguishing element that makes the designer’s design look more “professional”.

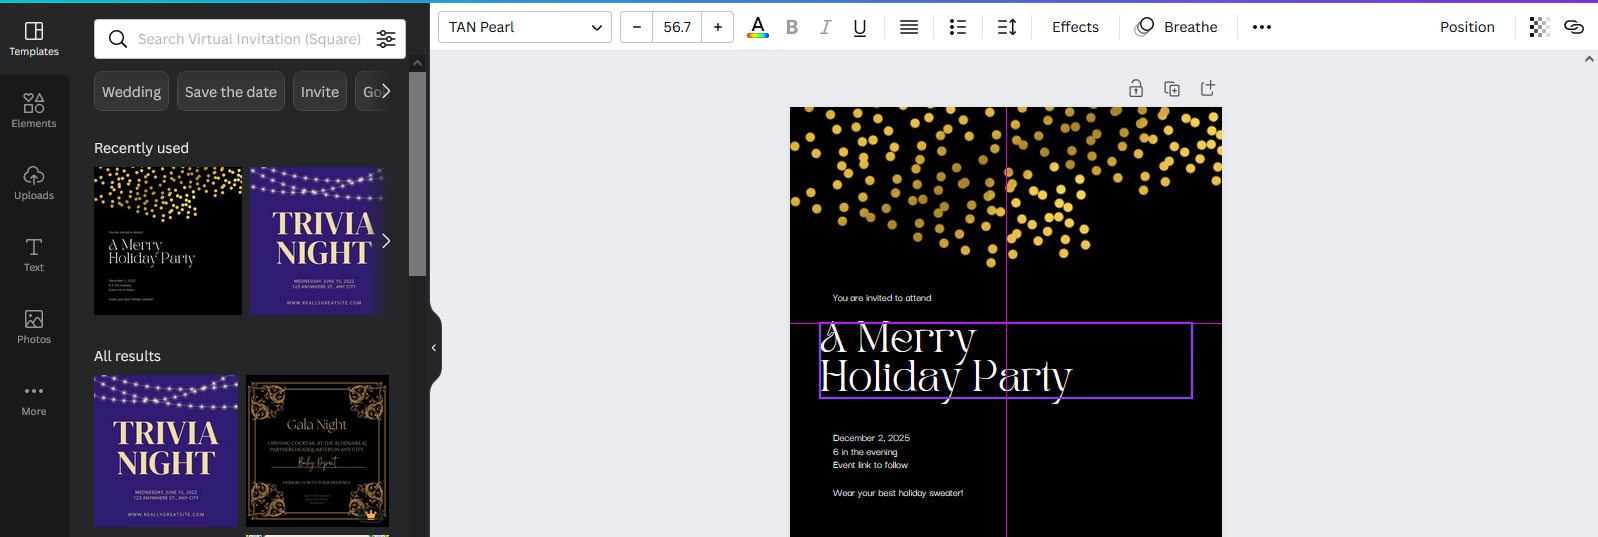
Notice the above design. If you draw an imaginary vertical line at the center both the halves look very similar. This is achieved by positioning the image at the center.
On the other hand, here is another design where balance is achieved differently.

In the above design, there is a lot of text on the right. The photo on the left balances this text visually without affecting the higher priority the text portion assumes here.
Kimp tip for designing with Canva
When you have to plan the graphics and text for your design in Canva, clearly define their visual weights and priorities in the design. Try balancing the design by combining multiple elements of smaller visual weights to compensate for one element of large visual weight.
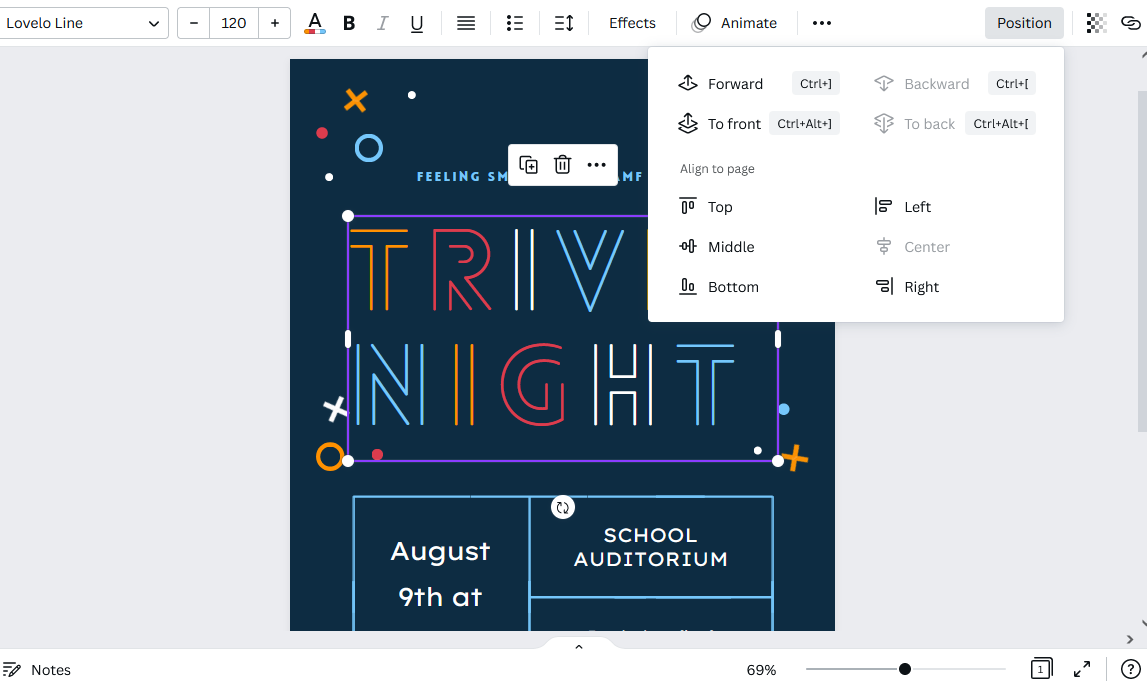
And when you have to arrange the sections in order to create balance, use the position option while editing the template. The position option comes in handy to move text boxes or images to the center, top, bottom, left, or right sections in the image.
4. Alignment
Alignment refers to the positioning of the elements within the frame. For example, are they all lined up against the same vertical axis or are their centers aligned? Are they all placed on the same horizontal line?
Horizontal and vertical alignment creates a sense of order. Would you have found it convenient to read this blog post if the first word of each sentence began at a random point? The common left margin makes the text easy on the eyes.
And alignment helps establish the relationship between elements. Let’s look at an example to understand this better.

In the above design, there is a different axis of alignment used for different sections in the text. This helps separate them from each other while also showing the connection within. For example, the “Register Now For Free Trial” section is aligned with a common left margin. The contact options at the bottom all have a common horizontal margin.
Kimp tip for designing with Canva
Breaking your text into individual sections helps the overall message easier to understand for the customers. Create a uniform alignment within each of these sections so that they look organized.
To simplify alignment while customizing your templates on Canva you can turn on the rulers and grids. Within each section, you can choose left, center, or right alignment.
When you move around objects in Canva you must see smart guides popping up whenever the margins of the chosen object align with the margin or the center of another object or the design margin. This helps you better position your elements in such a way that they are uniformly aligned or aligned differently to show separation.
5. Movement and hierarchy
Even the best-looking designs will not solve the purpose if there is no hierarchy or order. Every design needs an attention-grabbing detail and other elements that establish a direction, or a sense of movement.
When there is a sense of movement in the design, users find it to be interactive. And for this, you can use lines and arrows. Another way will be to play with the alignment of the objects in the design in such a way that they all point in a particular direction.
Movement creates a hierarchy in the design. In other words, it tells users about the priorities in the design. It tells them which text or graphics to see first and which one to see last. Finally, these all lead up to the CTA. That’s how you use movement and hierarchy to create conversions.
Kimp tip for designing with Canva
The element with the highest level of contrast from the rest of the design is the first to be noticed. That’s why most designs use the brightest and boldest fonts for the hero text or the title text.
The mildest contrast is last observed. For example, in a design with a black background, you are more likely to notice bright white text first and mellow grey text last. Use this idea when you choose colors on Canva. The same applies to size as well.

In the above design, for example, you notice the car name first owing to the big font. And then you read the lease details. In the right order, the ad first tells you what car is in focus and then talks about the purpose of the ad (the lease details in this case).
Customizing Canva Templates With Design Principles in Mind
Having seen some of the main design principles to use, we’ll tell you why they matter:
- Design principles make your designs look more organized. You do not want graphics that look like the elements are hastily put together. A well-planned design builds credibility.
- Design principles ensure that users grasp the message without any difficulty. For example, poor contrast makes it difficult for users to read the text. They abandon the ad or form a bad impression about the brand when this happens.
- And when you customize Canva templates, these design principles act as references to ensure that your design objectives are met.
These principles are better understood when you start executing them in a few design projects. Working with a professional design team like Kimp simplifies this process. When you leave it to the Kimp team to customize your Canva templates, you do not have to worry about understanding the nuances of alignment, balance, and contrast.
Designing With Canva Made Simpler With Kimp Subscriptions
With your Kimp subscriptions, you have the flexibility to switch between fully customized designs to Canva template customization as and how you prefer. This way you can retain full control over your designs and create projects that you can conveniently edit to your liking in the future.
Register now for a free 7-day trial.